REVENUE GENERATED $323,177,125.27+

(407) 955-4745

How to Sell Food on Amazon: Your Complete Guide to Success

Selling food on Amazon is a fantastic way to reach millions of customers looking for convenient grocery options. With online grocery sales projected to reach $100 billion by 2025, this is the perfect time to start. But navigating Amazon’s requirements, ensuring food safety compliance, and optimizing your business for success are crucial.

Here’s a step-by-step guide to help you sell food on Amazon effectively.

Yes, Amazon allows sellers to list and sell food products in the Grocery & Gourmet Food category. Whether you’re offering snacks, beverages, or specialty items, Amazon provides access to a vast customer base.

However, sellers must meet specific requirements to ensure product quality, safety, and compliance with Amazon’s policies.

Benefits of Selling Food on Amazon

  • Large Market Potential: Online grocery shopping is growing rapidly, with billions in sales projected.
  • Global Reach: Amazon’s worldwide marketplace gives you access to customers across the globe.
  • Customer Trust: Shoppers trust Amazon for high-quality products and fast delivery.
  • Scalability: Fulfillment tools like Amazon FBA make it easier to grow your business.

Challenges to Be Aware Of

  • Strict Regulations: Amazon has detailed requirements for food safety and labeling.
  • High Competition: Competing with well-established brands can be tough.
  • Complex Logistics: Managing temperature-sensitive or perishable items adds an extra layer of complexity.
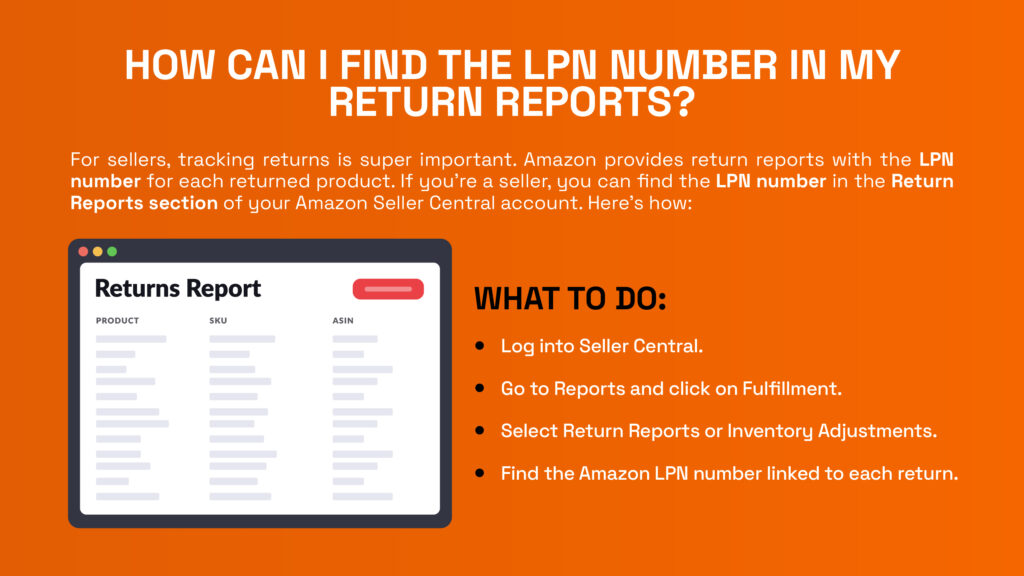
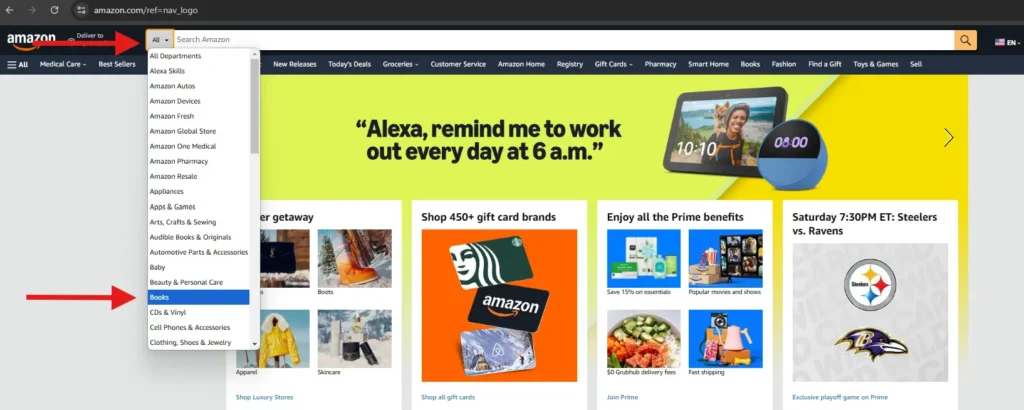
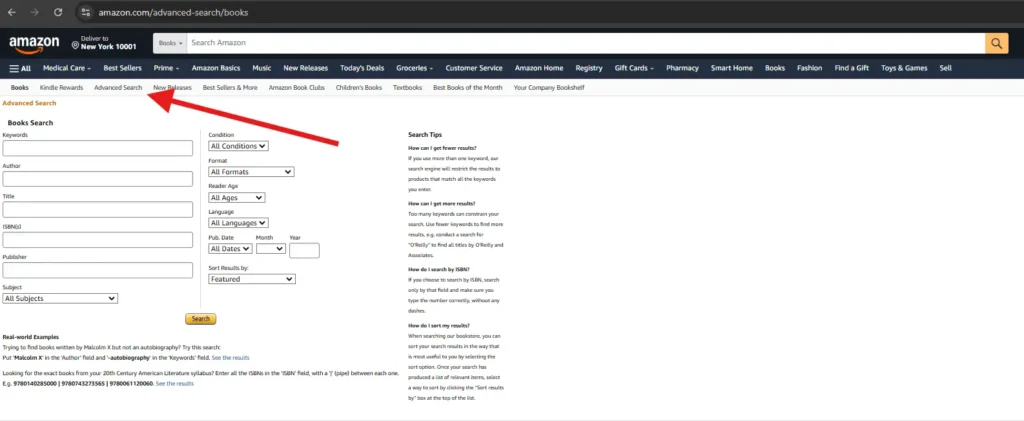
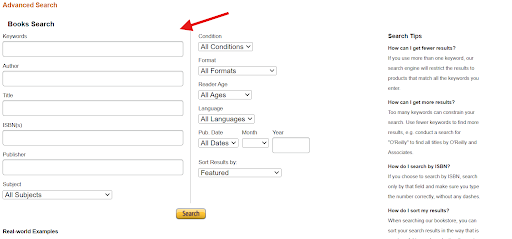
Before listing your products, you need approval to sell in the Grocery & Gourmet Food category. Here’s how to get started:

  1. Submit an Approval Request: Log in to Seller Central, find your product, and follow the prompts to request approval.
  2. Provide Documentation: You may need to submit:
    • GFSI (Global Food Safety Initiative) or HACCP (Hazard Analysis and Critical Control Point) certifications.
    • Photos of your product packaging, including labels and expiration dates.
    • Proof of compliance with local food safety regulations.
  3. Review Process: Amazon will review your submission and let you know if more information is needed.

Amazon requires food sellers to meet certain criteria to maintain quality and safety standards:

  • Performance Targets:
    • Order Defect Rate: Below 1%.
    • Late Shipment Rate: Less than 4%.
    • Pre-Fulfillment Cancel Rate: Below 2.5%.
  • Labeling Standards:
    • Include a complete ingredient list.
    • Display expiration dates on each unit.
    • Add allergen warnings where applicable.
  • Packaging Guidelines:
    • Use tamper-proof packaging.
    • Ensure durability for shipping.

Selling refrigerated, frozen, or temperature-controlled food requires extra care to meet Amazon’s standards:

  • Storage Temperatures:
    • Refrigerated: Maintain 32°F–40°F.
    • Frozen: Keep at 0°F or below.
  • Packaging Materials:
    • Use insulated containers or boxes with gel packs.
    • Dry ice can be used for frozen items but must follow shipping regulations.
  • Labeling: Clearly mark packages as “Keep Refrigerated” or “Keep Frozen” to inform handlers and customers.

Staying compliant is key to avoiding penalties and maintaining a successful Amazon business:

  1. Follow FDA and USDA Guidelines: Ensure your products meet federal food safety standards.
  2. Review Amazon’s Policies Regularly: Stay updated on changes to the Grocery & Gourmet Food Seller Requirements.
  3. Use Food Safety Tools: Platforms like FoodDocs help streamline compliance with automated monitoring and documentation tools.
  4. Inspect Storage and Packaging: Regularly check facilities to ensure cleanliness and proper temperature controls.

To maximize your success, leverage these tools and tips:

  • Inventory Management Software: Use tools like RestockPro to prevent stockouts and optimize storage.
  • Keyword Optimization Tools: Platforms like Helium 10 help identify popular search terms to improve product visibility.
  • High-Quality Product Images: Include professional photos that showcase packaging, labels, and product use.
  • Reliable Suppliers: Build partnerships with reputable manufacturers or distributors to ensure consistent quality.
  • Marketing Campaigns: Run Amazon PPC ads to target specific customer searches and boost sales.
  1. Choose High-Demand Products: Focus on trending categories like organic snacks, gluten-free foods, or keto-friendly items.
  2. Optimize Product Listings: Include relevant keywords like “healthy snacks” or “low-carb meals” in your titles and descriptions.
  3. Focus on Customer Reviews: Positive feedback boosts your credibility and attracts new buyers.
  4. Run Promotions: Offer discounts, coupons, or bundles to increase sales volume.
  5. Monitor Your Performance: Regularly review your order defect rate, customer feedback, and inventory levels.

Q1: Do I need FDA approval to sell food on Amazon?
No, but your products must comply with FDA regulations and Amazon’s food safety requirements.

Q2: What are the best-selling food products on Amazon?
Popular items include snacks, coffee, organic foods, and specialty diets like keto or vegan products.

Q3: Can I sell perishable foods on Amazon?
Yes, but you must meet Amazon’s temperature control and packaging requirements.

Q4: How do I stay compliant with Amazon’s rules?
Use tools like FoodDocs, regularly inspect storage conditions, and follow Amazon’s seller guidelines.

Selling food on Amazon is a lucrative opportunity, but it requires attention to detail, compliance, and effective marketing strategies. By following these steps and leveraging Amazon’s tools, you can build a thriving food business.

👉 Need help managing your Amazon seller account? Contact our Amazon Account Management Experts today for personalized support!

How to Find a Seller on Amazon: A Complete guide

A Complete Guide How to Find a Seller on Amazon

Amazon offers millions of products from various sellers, but sometimes you want to find a specific seller for customer support, inquiries, or to browse their store. Whether you’re a buyer or another seller looking to connect, this guide will show you all the possible methods to find a seller on Amazon.

There are several reasons to look for a seller on Amazon:

  • Contact for Product Issues: Reach out for missing parts, returns, or warranties.
  • Explore Their Store: Check out other products they offer.
  • Confirm Authenticity: Ensure the product is coming from a legitimate seller.
  • Leave Feedback: Provide seller feedback based on your shopping experience.

Here are all the ways you can find a seller on Amazon, step by step.

If you’ve already purchased or are looking at a product from the seller:

  1. Locate the Seller’s Name:
    • On the product detail page, check under the “Buy Now” button where it says “Sold by [Seller Name]”.
  2. Click the Seller Name:
    • This will take you to the seller’s storefront.
  3. Explore Their Storefront:
    • Browse their other products or scroll down to find the “Contact Seller” button.
  • Look for “Sold by [Seller Name]” beneath the Buy Box.
  • After clicking, you’ll be taken to their profile/storefront.

Amazon’s Advanced Search feature allows you to find specific sellers:

  1. Go to the Advanced Search Page:
  2. Select the “Seller” Option:
    • Enter the seller’s name in the designated field.
  3. View Results:
    • Amazon will display listings associated with that seller.

If you’ve already made a purchase from the seller:

  1. Go to Your Orders:
    • Log in to your Amazon account and navigate to “Your Orders” from the account menu.
  2. Find the Order:
    • Locate the order associated with the seller.
  3. Click “Contact Seller”:
    • Under the order details, you’ll find an option to message the seller.
    • Access the “Your Orders” section.
    • Click on “Contact Seller” next to the order.

If you know the seller’s name or store:

  1. Use Amazon’s Search Bar:
    • Enter the seller’s name or store name directly in the search bar.
  2. Refine Your Search:
    • Use filters like “Brand” or “Department” to narrow down results.
  3. Identify the Seller:
    • Check the product details to confirm listings sold by the desired seller.

If the seller has a custom URL for their store:

  1. Locate the Storefront Link:
    • URLs often follow the pattern: https://www.amazon.com/shops/[SellerName].
  2. Enter the URL:
    • Type the link into your browser’s address bar to access their storefront.

If you’re browsing a product and need information:

  1. Scroll to the Product Details Section:
    • Find the “Ask a Question” button near the “Sold by” field.
  2. Submit Your Question:
    • Amazon will direct your question to the seller.

If you’re unable to locate the seller:

  1. Visit Amazon Help Center:
  2. Request Assistance:
    • Select “Something Else” and explain that you’re trying to find a specific seller.
  • Check Multiple Listings: Some sellers offer products in multiple categories, so check related listings.
  • Use Accurate Names: Ensure you’re spelling the seller’s name correctly.
  • Look for Verified Sellers: Look for tags like “Amazon’s Choice” or “Fulfilled by Amazon” for reliability.

Q1: Can I message any seller on Amazon?
Yes, if the seller allows messaging. Look for the “Contact Seller” option on their storefront or through your order history.

Q2: What if I can’t find the seller’s name?
Reach out to Amazon Customer Support for help in locating the seller.

Q3: Can I leave feedback for a seller?
Yes, go to your order history and select “Leave Seller Feedback” under the relevant order.

Finding a seller on Amazon is simple when you know where to look. Whether you’re reaching out for customer support, checking their other products, or verifying authenticity, Amazon provides multiple ways to connect with sellers.

👉 Need help with Amazon account management or product listings? Contact Us for expert services!

How to Use Amazon Advanced Search: A Complete Guide

Amazon’s search functionality helps users explore millions of products with ease, but the Advanced Search feature is a powerful tool that allows for more precise and efficient searches. Whether you’re a buyer or seller, understanding how to use Amazon Advanced Search can save you time and help you find exactly what you’re looking for.

This guide provides an in-depth walkthrough of Amazon’s Advanced Search, covering every feature, step-by-step instructions, and helpful tips.

Amazon’s Advanced Search is a feature that allows users to refine their search by applying filters such as seller name, price range, product condition, language, and more. This feature is particularly useful for:

  • Finding Specific Sellers or Brands: Locate a seller’s storefront or find products from a particular brand.
  • Narrowing Down Categories: Search within specific categories like books, electronics, or apparel.
  • Filtering Results: Specify price ranges, conditions, or product features to find exactly what you need.
  1. Precision: Quickly locate hard-to-find products or specific items.
  2. Saves Time: Avoid sifting through irrelevant results.
  3. Customizable Searches: Tailor your searches with multiple filters.
  1. Competitor Analysis: Research competing products or sellers.
  2. Track Your Products: Check how your listings appear in searches.
  3. Discover Trends: Identify customer preferences and pricing strategies.

Currently, Amazon Advanced Search options are integrated into specific categories like Books. Here’s how to use it:

  • On the Amazon homepage, select “Books” from the category dropdown next to the search bar.
  • Scroll to the bottom of the page and find the “Advanced Search” link under the “Books” section.
  • Fill in fields like title, author, publisher, ISBN, or publication date to narrow down your search.

For categories without a dedicated Advanced Search page, use Amazon’s search filters:

  1. Search for a Product:
    • Enter a keyword in the search bar and hit enter.
  2. Apply Filters:
    • On the left-hand sidebar (desktop) or under the “Refine” menu (mobile), apply filters such as:
      • Price range.
      • Seller type (e.g., “Amazon.com,” third-party sellers).
      • Product condition (e.g., “New,” “Used”).
      • Shipping options (e.g., “Free Shipping,” “Prime Eligible”).

Amazon Advanced Search includes a variety of fields and filters to fine-tune your search. Here’s an overview:

Enter specific keywords related to the product, title, or description for precise results.

Choose from categories like Books, Electronics, Clothing, or Beauty to limit your search.

  • Enter a minimum and maximum price to find products within your budget.
  • Example: Searching for “laptops” between $500–$1,000.
  • New, Used, Certified Refurbished, or Open Box.
  • Ideal for finding budget-friendly or second-hand items.
  • Use the “Sold by” filter to find products from a specific seller.
  • Example: Looking for items sold by Amazon Basics or a particular third-party seller.
  • Prime-eligible items.
  • Free shipping options.
  • Filter results based on ratings (e.g., 4 stars and above).
  • Example: Finding top-rated books or electronics.
  • Particularly useful in categories like Books, where you can specify languages or international editions.

Fields like Title, Author, ISBN, Publisher, and Publication Date allow you to pinpoint rare or specific editions.

Use filters for features like screen size, resolution, storage capacity, or brand (e.g., Samsung, Apple).

Refine searches by size, color, material, or brand for more personalized results.


  1. Be Specific with Keywords: Avoid generic terms. Instead of “shoes,” try “women’s running shoes size 8.”
  2. Combine Filters: Use multiple filters like category, price range, and shipping options to narrow down results.
  3. Save Time with Brand Searches: If you prefer a specific brand, use the “Brand” filter immediately.
  4. Compare Products: Open multiple tabs to compare products from different sellers.
  5. Bookmark Advanced Search Pages: Save frequently used Advanced Search links for faster access.
  • Use more specific keywords or add additional filters to reduce results.
  • For categories without Advanced Search, use filters on the search results page.
  • If you can’t find a specific seller, confirm their store name or contact Amazon Support for assistance.

Not all categories have a dedicated Advanced Search page. However, filters can replicate many of the same functions.

Yes, apply the “Prime-eligible” filter to see only items available through Amazon Prime.

Amazon doesn’t currently support location-based searches for most categories, but you can filter by sellers offering international shipping.

No dedicated Advanced Search exists on the app, but filters provide similar functionality.

Amazon Advanced Search is a powerful tool that can save time and make your shopping or research experience more efficient. By using the available filters and fields, you can quickly locate specific products, sellers, or brands.

👉 Need help with Amazon account management, product listings, or advanced tools? Contact Us for expert services today!

LPN Labels on Amazon: The Secret Code for Returns!

Ever wonder how Amazon keeps track of all the stuff they sell, especially when someone returns an item? Well, they have a little trick up their sleeve: LPN Labels. These tiny labels help Amazon know exactly what’s what when products get sent back to them.

Let’s break it down in a simple way—kind of like solving a mystery!

What Is an Amazon LPN Label or Barcode?

An Amazon LPN label (License Plate Number) is a unique barcode that Amazon uses to track individual items, especially when they are returned. Think of it as a fingerprint for products, helping Amazon and sellers identify exactly which item is being processed, where it’s going, and what condition it’s in. The LPN barcode is essential for keeping things organized in Amazon’s massive warehouses and for ensuring that returned items are handled correctly. Now, let’s break it down in a fun way!

How Can the Amazon LPN Number Help a Seller Identify Amazon Returns?

The Amazon LPN number is like a name tag for each product. Imagine you run an online store and someone returns a package. How do you know what’s inside? Well, the Amazon LPN label makes it super easy! It lets sellers quickly figure out exactly what’s being returned. Whether it’s a book, a toy, or some funky socks, the LPN barcode on Amazon items helps sellers know what to do with the returned product—whether to resell it, repair it, or toss it.

Why Does Amazon Use an LPN Sticker?

Amazon is all about speed and accuracy. With millions of items flying around in warehouses, things could get messy. That’s why Amazon slaps an LPN sticker on items, especially when they are returned. The LPN label on Amazon makes sure each product stays in its proper place and doesn’t get mixed up with other stuff.

For example, let’s say someone returns a t-shirt, but the package gets jumbled up with electronics. The Amazon LPN barcode makes sure Amazon employees don’t mix the t-shirt with a phone charger! It’s a little code that says, “Hey, this is me!” to the warehouse robots and workers.

What Does the Amazon LPN Sticker Look Like?

An Amazon LPN sticker is pretty plain—it’s just a small white or yellow label with black text. You’ll see the letters “LPN” followed by a bunch of numbers and letters. It might look boring, but it’s like a superhero in disguise, keeping everything organized! So next time you see an Amazon LPN label, know it’s there to make sure things don’t go haywire in the warehouse.

How Does the Amazon LPN Number Work?

The LPN number on Amazon products works like a secret code. When an item moves around the warehouse, Amazon’s system generates a unique LPN number for it. Every time the item is scanned, the system knows where it is and what’s happening with it.

For example, you return a book to Amazon. They stick an LPN barcode on it, and that number follows the book everywhere it goes—through the warehouse, into storage, or back to the seller. It’s like leaving a digital trail that helps Amazon track the item’s journey, making sure nothing gets lost!

How Do I Find the LPN Number Sticker?

If you return something to Amazon, you might notice a little sticker with an LPN number on the product or its packaging. It’s usually placed in an easy-to-scan spot so the warehouse robots and workers can keep track of the item. Look closely at the box or bag, and you’ll probably spot the Amazon LPN sticker there!

How Can I Find the LPN Number in My Return Reports?

For sellers, tracking returns is super important. Amazon provides return reports with the LPN number for each returned product. If you’re a seller, you can find the LPN number in the Return Reports section of your Amazon Seller Central account. Here’s how:

  • Log into Seller Central
  • Go to Reports and click on Fulfillment.
  • Select Return Reports or Inventory Adjustments
  • Find the Amazon LPN number linked to each return.

These reports help sellers keep track of returned items and figure out if they’re ready to be resold or need to be fixed. It’s like using a checklist to make sure everything is in order.

Why Are Amazon LPN Return Labels Important?

Amazon LPN labels are super important for keeping the warehouse running smoothly. Imagine if Amazon didn’t use these labels—things would get lost, mixed up, and it would be total chaos! With LPN return labels, sellers can:

  • Track Returns: The Amazon LPN label helps sellers know exactly what’s being returned.
  • Check Product Condition: The LPN number lets sellers figure out if the returned item is still in good shape.
  • Manage Restocking: The LPN barcode Amazon uses helps sellers restock or refund items quickly and correctly.

In short, without the LPN sticker, Amazon’s return system would be a mess. But thanks to these little labels, everything stays organized and on track!

Conclusion:

So, what’s the deal with Amazon’s LPN labels? They’re tiny but mighty! These little stickers make sure that everything in Amazon’s warehouses stays organized, even when things get returned. Whether you’re a seller or a shopper, the LPN barcode is working behind the scenes to keep things running smoothly.

Next time you return something to Amazon, give a nod to the Amazon LPN sticker—it’s doing all the hard work, so you don’t have to!

If you want us to handle everything for your Amazon account, Join our Amazon account management services.